In order to connect to a jabber server you will need a computer running MS Windows or X windows environment with Qt>=3.1 library installed and configured, a jabber client software (we recommend PSI), internet or AM Freenet connection and desire to use ICQ with an alternative client software.
The following step-by-step instructions describe the process with illustrations and recommendations in a more detailed way.
It's assumed you are familiar with your environment and have the ability to perform basic actions, like installing software and making common configuration tasks using software menu-based interface facilities.
For X Windows environment it's also required to get and compile the SSL/TLS plugin from http://www.vision.am/dst/qca-tls-1.0.tar.bz2.
Additional language packs and pre-compiled packages for numerous platforms can also be found on the PSI download page.
X Windows users: unzip and untar the tarball, cd into the just created directory. The minimum survival commands are as root:
#./configure && make && make install
Don't forget to build the SSH/TLS plugin as well.
 In the "Register account" dialog input your jabber ID and
password and password confirmation. Your jabber ID should look like
yournick@jabber.vision.am. Check the "SSL encryptions" checkbox to
increase the connection security.
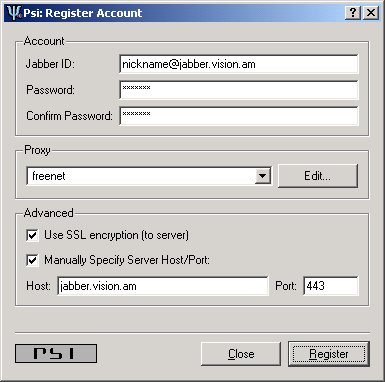
In the "Register account" dialog input your jabber ID and
password and password confirmation. Your jabber ID should look like
yournick@jabber.vision.am. Check the "SSL encryptions" checkbox to
increase the connection security. Those who have normal Internet connection shoud not set any proxy server settings and leave the "Manually specify server host/port" checkbox unchecked.
AM Freenet users are required to check "SSL encryption" checkbox and set up proxy settings as shown on the picture.
In proxy settings "proxy.freenet.am:3128" should be entered the same way as in Internet Explorer settings. Besides, "Manually specify server host/port" must be checked for AM Freenet users and "jabber.vision.am" and "443" should be entered in the corresponding fields. Click "register" to get your fresh jabber account.
To make your roster connect to the ICQ network you'll need to have a ICQ UIN registered. If you don't have a UIN yet and do not have own internet connection to do it yourself, ask someone of your friends to register you an ICQ UIN. For details on registration in ICQ network, refer to ICQ documentation or visit the mirabilis website.
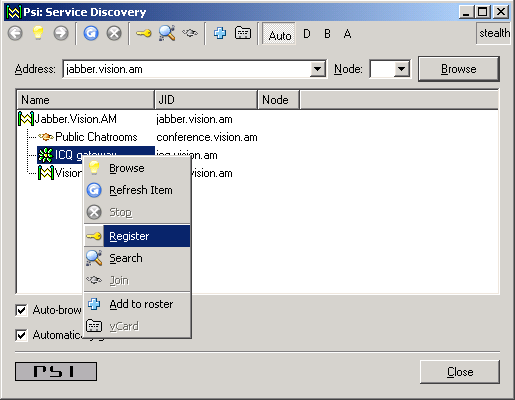 Once you are done with the UIN, it's the right time to bind
your jabber account to the ICQ UIN. In order to do so, select "services
discovery" from the PSI main menu. A window with available transports will
be displayed. Right click the ICQ transport icon and select "register"
from the drop-down menu as shown on the picture. Enter your ICQ UIN and
password in the corresponding fields of the dialog displayed and click
"register" to connect to the ICQ network. Once credentials are verified,
your contact list should fill into your roster.
Once you are done with the UIN, it's the right time to bind
your jabber account to the ICQ UIN. In order to do so, select "services
discovery" from the PSI main menu. A window with available transports will
be displayed. Right click the ICQ transport icon and select "register"
from the drop-down menu as shown on the picture. Enter your ICQ UIN and
password in the corresponding fields of the dialog displayed and click
"register" to connect to the ICQ network. Once credentials are verified,
your contact list should fill into your roster. Beware, your jabber password as well as your ICQ password are stored on our server in clear-text.
If you see "authorization granted" message from all the members of your contact list, just close PSI by selecting "quit" from the PSI main menu and run PSI again.
If you encounter problems in the process or notice strange behavior, please let admin@vision.am know.
Good luck!
For information on re-publishing of this document, please contact admin@vision.am.